Google Voice for iPhone Gets Multi-Person Texting, Sprint Integration, and More
Google Voice for iPhone Gets Multi-Person Texting, Sprint Integration, and MoreiOS: iPhone and other iOS device owners can finally get a feature in Google Voice that Android users have been enjoying for more than a month: Group texting. The update also adds more integration for Sprint iPhones and some other features.
Rather than having to type text messages in a single line text field, you now have a multi-line text entry field with character counts. The dialer also sports one-touch copying and pasting.
If you're a Sprint iPhone owner, now you'll be able to "send all calls to the native dialer when the phone is integrated with Sprint," according to Google's app description.
Note that some reviewers on the iTunes App Store are saying that there are login problems or account errors with the recent update, so it might be wise to wait a bit to see if any problems are worked out before updating.
Google Voice | iTunes App Store
Thursday, December 22, 2011
Google Voice for iPhone Gets Multi-Person Texting, Sprint Integration, and More

Thursday, October 6, 2011
WiFi Without Routers on Windows XP


SHARING YOUR EXISTING ETHERNET INTERNET CONNECTION
1. Go to Control Panel -> Network Connection.
2. Right click on Your Ethernet connection and click on “Properties”.
3. Go to “Advanced” Tab.
4. Check “Allow Other NEtwork….. Internet Connection”
5. In the Drop down Below select the Wifi connection of your pc. If it is disabled, it will be showing your wifi connection already.
6. Click on “Settings”
7. Check the protocols you need to share. Jamal has explained on them.I normally use only http and https.
8. Click on “Ok”.you reach the network connection page. The sharing part is now over.
FINDING DNS SERVER IP ADDRESS.
1. Click on Start -> Run
2. Type in cmd in the Run prompt
3. In the new window type “ipconfig /all” and press enter.
4. Note down your DNS server ip address from the screen.
CONFIGURING THE WIFI
1. Go again to Control Panel -> network connections.
2. Right click on your WIFI connection and click “properties”.
3. Go to”Wireless Network” Tab.
4. The “use windows to configure my wireless network connection” should be checked.
5. In the preferred network connection section click on add button
6. Enter a name of your wish to the network name.
7. Network authentication is “open”
8. Change Data Encryption to “Disabled”
9. Check the “this is a computer to computer …. not used” connection.
10. Click “Ok”.
11. Click on general tab. select “internet protocol(tcp/ip) and click on properties button.
12. Now type 192.168.0.1 in ip address, 255.255.255.0 in subnet mask, leave default gateway empty.
13. Fill in the DNS server entry which you had noted down earlier.
14. Click on “OK” and your network is set.
Your network should appear on the wifi network list now. Search for wlan on your phone. Connect and enjoy browsing on your phone.
Update: For those of you who get a “No gateway reply” or this doesn’t work, jump over to Dotsisx’s guide!
Trackback URL is here. Via: By - Vaibhav Sharma
WiFi Without Routers on Windows XP
SHARING YOUR EXISTING ETHERNET INTERNET CONNECTION
1. Go to Control Panel -> Network Connection.
2. Right click on Your Ethernet connection and click on “Properties”.
3. Go to “Advanced” Tab.
4. Check “Allow Other NEtwork….. Internet Connection”
5. In the Drop down Below select the Wifi connection of your pc. If it is disabled, it will be showing your wifi connection already.
6. Click on “Settings”
7. Check the protocols you need to share. Jamal has explained on them.I normally use only http and https.
8. Click on “Ok”.you reach the network connection page. The sharing part is now over.
FINDING DNS SERVER IP ADDRESS.
1. Click on Start -> Run
2. Type in cmd in the Run prompt
3. In the new window type “ipconfig /all” and press enter.
4. Note down your DNS server ip address from the screen.
CONFIGURING THE WIFI
1. Go again to Control Panel -> network connections.
2. Right click on your WIFI connection and click “properties”.
3. Go to”Wireless Network” Tab.
4. The “use windows to configure my wireless network connection” should be checked.
5. In the preferred network connection section click on add button
6. Enter a name of your wish to the network name.
7. Network authentication is “open”
8. Change Data Encryption to “Disabled”
9. Check the “this is a computer to computer …. not used” connection.
10. Click “Ok”.
11. Click on general tab. select “internet protocol(tcp/ip) and click on properties button.
12. Now type 192.168.0.1 in ip address, 255.255.255.0 in subnet mask, leave default gateway empty.
13. Fill in the DNS server entry which you had noted down earlier.
14. Click on “OK” and your network is set.
Your network should appear on the wifi network list now. Search for wlan on your phone. Connect and enjoy browsing on your phone.
Remember the tips Jamal had shared, switch off the network when not needed.
Update: For those of you who get a “No gateway reply” or this doesn’t work, jump over to Dotsisx’s guide!
Trackback URL is here. Via: By - Vaibhav Sharma
Thursday, September 29, 2011
MagicJack for iPhone Provides Unlimited Free Calling Within the US and Canada
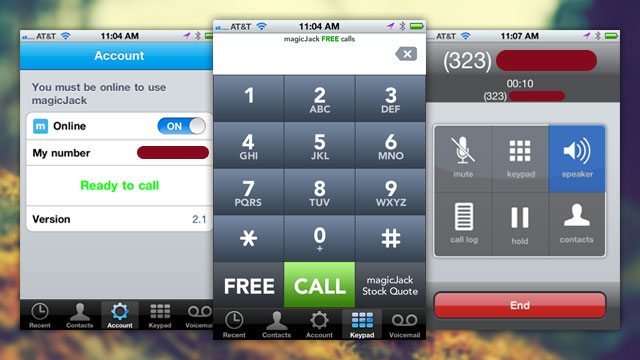
You've probably heard of the MagicJack phone service that lets you make unlimited free calls within the US and Canada for the price of the required hardware and your internet connection. The MagicJack iPhone app lets you do the same thing from your iOS device, only you don't have to pay for it at all.
Like most VOIP apps, you can make calls over Wi-Fi or 3G. You can make a call directly from the app without even signing up if you're impatient—or if you need to call from an anonymous, disposable number. Going through the very simple sign-up process will assign you your own number, however, so that is a bonus if you'd like to make most of your calls from the app. If you already own a MagicJack, you can use your same account on your iPhone so the number can be shared. MagicJack lets you access your iPhone contacts and any contacts saved to your MagicJack account so you don't have to remember any phone numbers. Like most VOIP apps on the iPhone, the call quality is a little bit better than what you get with AT&T (and I'm not sure how it compares to Verizon).
There aren't many downsides, as it's hard to complain about a free app that lets you make free phone calls across most of North America, but one thing that's kind of weird is that when you call an iPhone contact it shows their number instead of their name. You still select their name just like you would in the buit-in phone app, but when calling it shows their number instead (you can see this in the screenshot up top). Additionally—and this is more strange than anything else—there's a dedicated button on the dialer to check MagicJack's stock price. We're not sure why that's such a prominent part of the app, but it's not really a problem.
The bottom line is this: if you want to make free VOIP calls to landline phones in the US and Canada from your iPhone, iPod touch, or iPad, download MagicJack. It works well and won't cost you anything beyond what you're already paying for wireless internet/cellular data.
MagicJack | iTunes App Store (Source:Lifehacker)
Monday, September 26, 2011
Maryfi is a Free Software Router for Windows 7
Maryfi is a Free Software Router for Windows 7
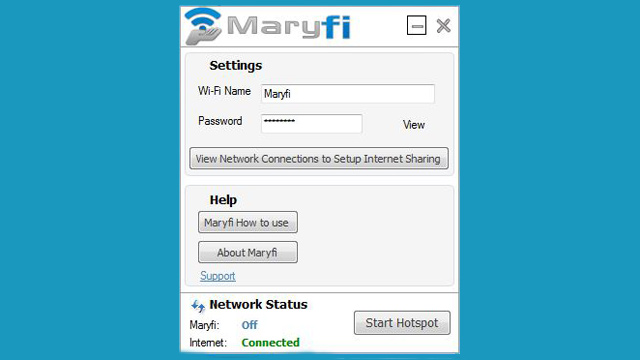
Maryfi is a Free Software Router for Windows 7Windows: Remember Microsoft's Virtual Wi-Fi project for Windows 7? Well the project is officially dead, but the source code is still available, and free application Maryfi takes advantage of this to provide a software router that can share single-serve Wi-Fi networks such as those used at airports, hotels, etc.
Tethering and mobile hotspots such as Verizon's MiFi or T-Mobile's HotSpot are great if you're a frequent traveler or if your company is footing the bill. I travel to one or two conventions a year and usually tether to my phone's connection for Wi-Fi, but I didn't get a very good connection on the 37th floor and had to pony up for $15 for one day of unlimited Wi-Fi. Even worse was that the two friends I shared the room with used my laptop when they needed to check their email. If I had Maryfi, I could have just shared my hotel connection with everyone in the room.
Maryfi can share any type of internet connection on the host computer; other Wi-Fi enabled devices can see and join the Maryfi hotspot which can be secured with WPA2 encryption. Another use is to setup Maryfi as a repeater for your home router—this can help you stretch connectivity to a device just outside your current Wi-Fi range.
Maryfi is a free ad-supported program for Windows 7 available from the developer link below.
Maryfi - Start Your Own Wi-Fi Hotspot
(Source)
Saturday, September 24, 2011
Create Virtual Router to Share PC Internet Connection with Any Wifi Device.
Create Virtual Router to Share PC
Internet Connection with Any Wifi Device.
Consider the scenario where you have a wired internet connection used
with your computer and want to share it with other devices like your
android phone, iPhone, Xbox or any other device that supports wifi.
The most common way is to use a wireless router which acts as an
access point. Just plug in your Internet connection to the wireless
router and all your Wifi enabled devices will be able to access the
shared Internet connection.
But what if you don't have a router or you don't want to use your
router for the internet sharing? Not to worry. You can easily make the
wireless network adapater of your PC or laptop to behave like an access
point to which any other Wifi devices can connect.
First some details -
There are two types of wireless networks - ad-hoc network and access
point. Ad-hoc network is something where there is no central coordinator
and all devices communicate directly with each other. This has some
disadvantages including congession.
With an access point, there is a central device which coordinates
communication of all devices. All traffic flows through this access
point and devices do not communicate with each other directly. This is
exactly the case when you use a router.
Ok, so why do I need to know all these?
Although both type of networks can be used to share Wifi, many
devices like android phones cannot connect to ad-hoc networks. That
means if you configure your computer wifi for adhoc sharing, your
android phones will not detect or show the network.
Hmm, so how do I create an access point out of my PC
Although most network cards nowadays allow creating virtual hotspots
or access points, the operating system also needs to support virtual
networking mode. In case of Windows, only Windows 7 and above support
this.
With older versions like Win XP or Vista, you can only create ad-hoc networks which will only work for some devices including iPhone and not for others like your android phones.
To setup an access point in Windows 7, you can use this free software - Virtual Router.
Creating an access point is very easy. Just start virtual router,
assign a password and click on "Start virtual router". That's it, you
have a new wireless network to which any Wifi enabled device can connect
and access the internet via your computer's internet conection.
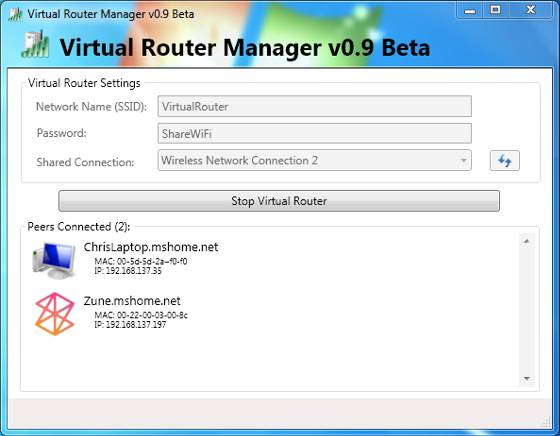
As
new devices join the Wireless network, their assigned IP and MAC
addresses instantly appear in the Virtual Router window. And you can
click the "Stop Virtual Router" button anytime to deactivate the hotspot
and disable Internet sharing.
Virtual
router currently works on Windows 7 and Windows Server 2008. If you
experience issues creating an access point, please check to make sure
your wireless adapter is in the list of supported devices.
(Source)
Tuesday, August 9, 2011
Wondershare LiveBoot 2012 Free Serial Key
Sometimes your computer may stops responding ,it could be a crashed hard drive, a virus attack, data loss or it may due to some other reason. Wondershare LiveBoot 2012, is powerful software with over 40 hard disk tools to recover a crashed system and fix all boot up problems. With this tool you can restore the operating system , rescue lost data, boot Windows with a USB, backup and restore files, copy hard drive data to another drive, disk management tools and all other useful features that you might need in recovering a crash or unbootable system.

Integrating with the latest Microsoft WinPE technology, bootable LiveBoot CD or USB drive allows you to boot up any computer .The user-friendly interface simplifies the complicated repair procedures into only a few clicks for both beginners and experienced users.
Main Functions
• Windows Recovery - Provide a complete solution set for all Windows crash and booting problems including booting failure, virus affection, blue / black screen, and more.
• Data Recovery - Rescue any data from your internal / removal hard disk or partitions no matter deleted, formatted, or whole disk corrupted, including documents, archives, emails, photos, videos, and audio files.
• Disk Management - Complete disk management solutions including partition management, disk / partition cloning, disk / partition wipe, and more.
• Password & Key Finder - Reset Windows password when you forget the login password and find Windows or Office product key when you want to reinstall them.
Boot up any computer
• Boot up any desktop or laptop when you cannot enter Windows, your computer crashes, or you want to work under boot environment.
• Boot up computer by inserting bootable CD to your CD drive or pluginning USB drive, and restarting your computer.
• Latest WinPE technology - 100% hardware compatibility.
Rapidly rescue crashed computer or hard drive
• Boot up computer if it is infected by virus.
• Fast recovery from crashes such as bluescreen and blackscreen.
• Fix booting problems, random crashes and missing file crashes such as 'ntldr is missing', 'bootmgr is missing', etc.
• Repair partition table, corrupted registry, virus-infected registry key value, and crashed MBR even it is infected by virus.
• 1-click system file recovery.
• Rescue Windows 98/ME/2K/HOME/2003/XP/NT/Vista and Windows 7.
Rescue data from crashed computer or hard drive
• Transfer files (photo, music, document, etc.) To external storage devices if your computer or hard drive is badly damaged or cannot be restored.
• Rescue files from formatted or crashed hard drive.
• Rescue files from crashed Windows.
Wipe entire hard drive or partition
• Deep wipe the entire hard drive or partition with one-click. It can be used for the below purposes.
• Give you a fresh start when you want to reinstall Windows.
• Kill virus when your computer is affected with boot sector virus.
• Speed up hard drive when you want to clean an old hard drive.
• Prevent your data and files from recovering by data recovery software when you want to donate your computer.
Backup and restore file & system
• Backup and restore your file / folder, partition, disk or entire hard drive at any moment.
• Backup file to various storage devices such as USB, internal hard drive, CD, DVD, ZIP, FireWire, etc.
• Back up large volume data in minutes.
Partition, format and clean your disk
• Provide perfect partition management - creating, deleting, activating, resizing, merging, splitting, converting, formatting, hiding, etc.
• Flexible enough for you to clone a partition or entire hard drive to an internal disk or external disk as you like.
• Recover MBR (Master Boot Record), rebuild the lost partition table, and surface scan to check for bad sectors.
• Deep clean entire hard drive or partition with one-click.
Clone entire hard drive and partition
• Clone entire hard drive or partitions to an internal or external disk.
• The cloned hard drive will be bootable.
• Support all Windows version, IDE, SATA, SCSI, USB, FireWire, and more
The full version of the software cost $59.95 , but Wondershare is giving away this wonderful application for FREE to everyone . Click here and provide your valid name and email address to get the free keycode of the Wondershare LiveBoot 2012.Check your inbox for the registration details and the link to download the software.
Please note Giveaway link is active till August 12, 2011.
(Source:Spark)
Hiren's BootCD v14.0 Rebuild by DLC v2.0
Hiren's BootCD v14.0 Rebuild by DLC v2.0

Hiren's BootCD v14.0 Rebuild by DLC v2.0 | 619.97 MB
As you know, Hiren's BootCD v13.0 is now pretty much legal as just about all of the commercial software has now been removed. While good in some ways it does now mean many of the programs which made this such a great BootCD have gone. DLC put back some important tools: Norton Ghost, Acronis Disk Director, Acronis True Image,...and added some more good tools.
Changes From Rebuild by DLC v1.0:
Add into menu:
+ Norton Ghost Normal 11.5.1
+ Auto Restore Ghost from WinXP.gho on CDROM to Partition 1
+ Auto Restore Ghost from Win7.gho on CDROM to Partition 1
Rebuild Mini Windows XP:
Remove programs:
Dr.Web CureIt! Antivirus (60.5 MB)
ComboFix (Malware Removal) (4.09 MB)
Add new programs:
Backup:
+ Active@ Disk Image 5.0.2
Internet:
+ Mozilla Firefox 5.0
+ Internet Download Manager 6.06 Beta Build 7
Recovery:
+ Active@ File Recovery 8.0.0.1
+ Active@ Partition Recovery 6.0
+ Active@ KillDisk 5.2.4
System Information:
+ HWiNFO32 v3.81.1290
+ Sys Info for Win 2011.5.26.0
Graphic:
+ Gadwin PrintScreen Pro 4.7.2601
Antivirus:
+ BkavHome3349
+ Kaspersky Virus Removal Tool 9.0.0.722 [20/06/2011]
+ Kaspersky TDSSKiller 2.5.5.0
Utilities:
+ WinNTSetup 2.0
+ Active@ Password Changer Pro 4.0.0.111
Download:
http://www.filesonic.com/file/1546151321/HBCD.14.0.Rebuild.v2.0.part1.rar
http://www.filesonic.com/file/1546103551/HBCD.14.0.Rebuild.v2.0.part2.rar
http://www.wupload.com/file/70783586/HBCD.14.0.Rebuild.v2.0.part1.rar
http://www.wupload.com/file/70783587/HBCD.14.0.Rebuild.v2.0.part2.rar
http://www.fileserve.com/file/qRGDQ3G/HBCD.14.0.Rebuild.v2.0.part1.rar
http://www.fileserve.com/file/ExPS5D8/HBCD.14.0.Rebuild.v2.0.part2.rar
http://www.uploadstation.com/file/9rYprh4/HBCD.14.0.Rebuild.v2.0.part1.rar
http://www.uploadstation.com/file/hff5vt2/HBCD.14.0.Rebuild.v2.0.part2.rar
http://ul.to/9bl68f2z/HBCD.14.0.Rebuild.v2.0.part1.rar
http://ul.to/raocmt5k/HBCD.14.0.Rebuild.v2.0.part2.rar
HTTPS Everywhere Now

HTTPS Everywhere Now Supports Secure Browsing on Over 1,000 Sites
Firefox: Firefox extension HTTPS
everywhere, which switches your browser to SSL automatically for any
web sites where a secure connection is available, just hit version 1.0
and now supports well over 1000 sites, including Facebook, Google, Twitter, Tor, and others.
 Firefox: Firefox extension
 HTTPS
Everywhere is a product by the Electronic Frontier Foundation (EFF) and
is currently only available for Firefox. The EFF notes that they want
to build Chrome version, but unfortunately the extension wouldn't work
in Chrome without changes to the browser's source. The last time we looked at HTTPS everywhere,
it only supported a handful of sites. Now, the extension boasts
hundreds of new ones, including file transfer and upload services,
social networks, and more. The new version also addresses some of the
performance issues in the beta version.
(Source: Lifehacker)
Monday, July 11, 2011
How to Install and Set Up SSH on Your Jailbroken iOS Device
 SSH is one of the first things you should install and set up on your jailbroken iOS device because it makes securely transferring files to and from your device very easy. Here's how to do it.
The video above will walk you through the steps of installing OpenSSH, connecting for the first time, and changing your password, but here's an outline of each step for your reference:
- Open Cydia and scroll down the main page to where it says "OpenSSH Access How-To." Tap that option.
- On that page, click the blue linked text "Open SSH" in the first step. You'll be presented with the OpenSSH package page. Click the install button in the top right corner, confirm when it's finished, and return to Cydia.
- Open the Settings app from your home screen and go into your Wi-Fi settings. Click the little blue arrow next to the Wi-Fi network you're currently connected to. Make a note of your IP address in the "IP Address" field (it should start with 10 or 192).
- To connect to your iOS device from your computer, use an SSH-capable application like Terminal on OS X or puTTy on Windows. Type
ssh root@YOUR_IP_ADDRESS(replacingYOUR_IP_ADDRESSwith your actual IP address). When prompted, enter your password. It's alpine by default. Once finished, you're connected! You can also use an SFTP application like Cyberduck to connect as well, but that'll limit your interactions to pretty much only file transfers. - Lastly, you want to change your password. To do this, type the passwd command. You'll be asked for a new password. Type it (nothing will show up for privacy reasons) and press enter. Type it in again to confirm it. Assuming you type your password correctly, you will be told it was changed successfully.
(Source)
How To Add a Second Router to Increase Wireless (Wi-Fi) Network Range.
The range of your wireless router depends on many factors like the type of your router (802.11g or 802.11n), walls and other things that obstruct Wi-Fi signals in the area.
Although the 802.11n router typically have a higher range, it may sometimes be difficult to get a good signal in certain areas of your house like your first floor bedroom or the corner study room.
There are many ways to increase the range of your existing Wi-Fi router. But if these doesn't work and you have a spare wireless router, then you can easily extend your existing home network without spending anything for boosters or repeaters.
 The trick is to connect the second router to your existing one with an Ethernet cable
and make both transmit the same signal. This way, we are not creating a
new network, but expanding the existing Wi-Fi network to improve the
range.
The trick is to connect the second router to your existing one with an Ethernet cable
and make both transmit the same signal. This way, we are not creating a
new network, but expanding the existing Wi-Fi network to improve the
range.
Consider a house with layout as below. There is a router in room-1 which is the main router connected to the ISP provide modem. Consider that have good signal in room-2, but the signal is quite weak in room-3 as it is far off and separated by more walls. Let's see how we can connect a second router in say room 2 so that the wireless network reaches in room-3 as well with good strength.

1. Note down settings of main router
Next we need to configure our second router.
Now we are ready to connect both routers. There are two connections to be made.
First, connect any one LAN port of first router with any one LAN port of second router. The WAN port of first router should be connected to the ISP modem and just leave the WAN port of second router free as below.

That's it. Now everything is setup. You can connect your laptop or any other device to the second router and all your shared pictures, videos and files will be accessible. Since we are just expanding the reach of the existing wireless network, no additional configuration changes needs to be done in your laptop or other devices.
Also, you get three additional ports free in your second router, just in case you want to connect more devices to the wireless network using Ethernet Port.
(Source)
Although the 802.11n router typically have a higher range, it may sometimes be difficult to get a good signal in certain areas of your house like your first floor bedroom or the corner study room.
There are many ways to increase the range of your existing Wi-Fi router. But if these doesn't work and you have a spare wireless router, then you can easily extend your existing home network without spending anything for boosters or repeaters.
The trick is to connect the second router to your existing one with an Ethernet cable
and make both transmit the same signal. This way, we are not creating a
new network, but expanding the existing Wi-Fi network to improve the
range.Consider a house with layout as below. There is a router in room-1 which is the main router connected to the ISP provide modem. Consider that have good signal in room-2, but the signal is quite weak in room-3 as it is far off and separated by more walls. Let's see how we can connect a second router in say room 2 so that the wireless network reaches in room-3 as well with good strength.
1. Note down settings of main router
- First we need to find the IP address of the main router in room-1.
You can get this with the following command to be run from your command
prompt or your windows run box.
cmd /k ipconfig
After running the command, the value of "Default Gateway" shown is the IP address. Assume for now that your routers IP address is 192.168.30.1. Also note the value of "Subnet Mask" which is usually 255.255.255.0. - Now open a web browser and type in the routers IP address with http:// added. E.g.
http://192.168.30.1
You might be asked to provide a username/password. The usual values for most routers are "admin/admin", "admin/password" or "admin/(no password)". If you are not able to get in with any of these, just Google for " default router password" and you should get it. - Once in, note down the following from wireless settings tab.
1. Wireless mode
2. SSID
3. Channel
4. Security mode(WPA, WPA2, WEP etc) and the password if you have protected your Wi-Fi with password.
Next we need to configure our second router.
- First press on the reset button of the second router for 10 seconds to reset all settings. Now connect it to your laptop with an Ethernet cable (one end to any one of router's LAN ports and other to your laptop Ethernet port).
- Open a web browser and type http://192.168.1.1 which is the default
IP address of the second router. This may vary depending on your router
vendor. E.g.
1. Linksys - 192.168.1.1
2. Netgear - 192.168.0.1
3. D-Link - 192.168.1.1
Once in, change the values of SSID, Wireless mode, channel, security mode and the password to match the first router. These values need to be the same for both routers and any mismatch could cause our setup not to work.
Then go to Setup->Advanced Routing and change the mode from Gateway to Router. Next disable DHCP server. All the dynamic IP allocations should be done from the first router alone.
Once done, change the IP address of the second router to any free address like 192.168.30.10. Also make sure the subnet mask also matches the first router and save settings.
Now we are ready to connect both routers. There are two connections to be made.
First, connect any one LAN port of first router with any one LAN port of second router. The WAN port of first router should be connected to the ISP modem and just leave the WAN port of second router free as below.
That's it. Now everything is setup. You can connect your laptop or any other device to the second router and all your shared pictures, videos and files will be accessible. Since we are just expanding the reach of the existing wireless network, no additional configuration changes needs to be done in your laptop or other devices.
Also, you get three additional ports free in your second router, just in case you want to connect more devices to the wireless network using Ethernet Port.
(Source)
Thursday, March 31, 2011
IKEA Shelf Desktop

featured desktop


Today's featured desktop is the first digital IKEA hack. It's a really simple desktop idea that takes an IKEA shelf and uses it to organize icons on the desktop.
Today's desktop comes from Aye Moah, who has graciously shared the simple instructions for how to make it yourself:
- Download the wallpaper from IKEA for your OS (PC or Mac). It's all in Hungarian but it's pretty obvious where to click.
- Open up the downloaded folder and you will find Backgrounds for different screen sizes with multiple colors: Green, Grey, Purple and Violet.
- Set up your desktop. (If you like to remove IKEA logo, you will need to open up Photoshop or Paint.net and remove it from the image itself). Note: the rest of this is only for Mac.
- Open up the folder named "IKEA-e-Folder-Icons-mac" and you will find a bench of icons named in Hungarian.
- If you know how to change the Mac icons for your folders on Desktop, do that. If you don't, here is how. To apply each folder with the new icon, you right click on the new icon file and click Get Info. You will get the Info window, click on the top left graphic and a light blue edge will be visible after you click it. Click Cmd + C to copy. Then go to the folder you want to apply this new icon, right click and click Get Info. Then you select the old icon and same as above, a light blue edge will be visible around the icon. Click Cmd + V to paste. Then you will have your desktop folders displaying in Ikea icons.
- Organize the icons in the bookshelf as you want.
Tuesday, February 15, 2011
Download Uniblue SpeedUpMyPC 2011 for Free
SpeedUpMyPC 2011 is Uniblue’s award-winning and top rated PC performance enhancer that helps you to boost your computer’s speed. This application scans your computer to identify the processes, files and settings that are slowing your computer down, before wielding a powerful range of tools to optimize your system for improved performance.

With single click simplicity, network settings, RAM and CPU function are all scanned, cleaned and tuned for speed, while junk files are deleted for space. The result is a computer that works faster and better, just like running a new computer!
SpeedUpMyPC 2011 – Features
Uniblue SpeedUpMyPC 2011 is normally costs $39.95 per single licensed copy. As part of the exclusive promotional offer from PC Authority, interested users can request for free valid license serial key for Uniblue SpeedUpMyPC 2011, which also includes 12 months of ActiveProtection – product updates and support.

You will receive an email notification with the instructions to activate the full version of SpeedUpMyPC 2011. Your free license serial code is in the email.
Now, download the setup installer of SpeedUpMyPC 2011 from here [Direct link].
After installed, use your license serial key to register and activate SpeedUpMyPC to fully functional version.
(Source)
With single click simplicity, network settings, RAM and CPU function are all scanned, cleaned and tuned for speed, while junk files are deleted for space. The result is a computer that works faster and better, just like running a new computer!
SpeedUpMyPC 2011 – Features
- Free Memory – Frees Up Memory (RAM)
- Monitors Memory Usage in Real-Time
- Automatically optimizes memory usage
- CPU Usage – Optimizes CPU Usage
- Assign More Resources to Your Favorite Applications
- Monitor CPU Usage in Real-Time
- Internet Speed – Test Your Connection Speed
- Removes Annoying Pop-ups While Surfing
- Startup Speed – Automatically Log Startup Times
- Improve Startup Times Considerably
- Stability – Recover from Crashes
- Terminate Suspicious Applications
- Use Quick Keys to Start System Recovery
- Test Disk Performance
- Shows Disk Usage om Graphs for the Last Hour
Uniblue SpeedUpMyPC 2011 is normally costs $39.95 per single licensed copy. As part of the exclusive promotional offer from PC Authority, interested users can request for free valid license serial key for Uniblue SpeedUpMyPC 2011, which also includes 12 months of ActiveProtection – product updates and support.
How to grab FREE license key of Uniblue SpeedUpMyPC 2011?
Simply visit the promotional page, then fill up all the required details and hit Submit to request for the free license serial key.You will receive an email notification with the instructions to activate the full version of SpeedUpMyPC 2011. Your free license serial code is in the email.
Now, download the setup installer of SpeedUpMyPC 2011 from here [Direct link].
After installed, use your license serial key to register and activate SpeedUpMyPC to fully functional version.
(Source)
Friday, February 11, 2011
Download Internet Explorer 9 Release Candidate (RC)

Tracking protection is one of the most important new features introduced in Internet Explorer 9 RC. This new privacy feature will allow users to identify and block many forms of undesired tracking such as cookies, web beacons, advertisements and trackers. Microsoft has included the ActiveX filter which allows users to switch off ActiveX elements within their session.
Internet Explorer 9 RC is definitely faster than the beta version. Even the harshest critics of IE have been praising the latest release for its design and faster response. Tab functionality has been improved in RC and the overall look & feel has improved leaps and bounds as compared to IE8.
Download Internet Explorer 9 RC
Below are the download links for IE9 RC
Download IE9 RC for Windows 7 (x86)
Download IE9 RC for Windows 7 (x64)
Download IE9 RC for Windows Vista (x86)
Download IE9 RC for Windows Vista (x64)
The final version of IE9 is expected to be released in April 2011. Till then enjoy this release candidate.
(Source)
Sunday, February 6, 2011
Download GreenPois0n RC5 to Jailbreak iOS 4.2.1 [How to Guide]

With GreenPois0n RC5, you will be able to jailbreak iOS 4.2.1 (untethered) on iPhone 4, iPhone 3GS, iPod Touch 4G/3G/2G, iPad and Apple TV 2G. Unlike Redsnow 0.9.7, Greenpois0n RC5 will not need any 4.2b3 SHSH Blobs saved on Cydia for Untethered Jailbreak.
Download GreenPois0n RC5

Update: Greenpois0n RC5_2 has been released which fixes some of the previous issues. Download it here or here.
Update: GreenPois0n RC5 released for Windows. Download at greenpois0n.com or here.
How to Jailbreak iOS 4.2.1 using GreenPoisOn RC5?
Disclaimer: The guide is purely for informational and educational purposes only. Jailbreak your device at your own risk.Do not proceed if you rely on carrier unlock. Ultrasn0w doesn’t support this baseband yet.
1. Download GreenPois0n RC5 from the links given above.
2. Connect your iDevice running iOS 4.2.1 to the USB of your mac.
3. Start GreenPois0n RC5 and click on Jailbreak button. Follow the on-screen instructions to put your device in the DFU mode.
4. Click again on Jailbreak button of Greenpois0n to start the jailbreaking process.
5. Wait for GreenPois0n to complete its steps. Once it’s complete, you will see a “Loader” icon on the springboard. Tap on it and install Cydia.
Voila! Your iDevice is now jailbroken with iOS 4.2.1!!
(Source)
Saturday, February 5, 2011
Ultimate List of Android Security Apps

Google’s Android OS is growing at a rapid pace and is expected to be the most widely used smartphone OS in 2011. Being an open source software has its advantages as well as disadvantages. The main disadvantage being susceptible to hackers and other dangerous stuffs. You have every reason to secure your Android device and we tell you how.
Android Security
According to M86 Security research, in 2011, smartphones will be a bigger cyber security target, with loads of vulnerabilities like malware-as-a-service and more sophisticated Trojans. Now that there are more and more android tablets pouring in, the security aspect has gained even more ground than before. Luckily, with Android 2.2 (Froyo), the security apps can run in the background continuously while you work on other apps.
We are listing out some of the best android security apps which includes anti-virus apps, wipe or recovery apps, automated backups and password management apps. Be it a Droid or Nexus or Galaxy or Evo, these apps will help you keep your device safe and secure. Note that the apps are not ranked in any order as such, but just listed down randomly.
Android Security Apps
We will be categorizing the apps in order to help you choose the ones based on your specific needs.
Anti-virus, malware & theft protection apps
1. Lookout Mobile Security
Lookout must be one of the first apps you must install right after buying an Android device. Lookout comes in two versions – free and premium. The free version lets you scan your phone/tablet for malware, back-up and restore your data online, and also to recover your lost phone. Though the free version is good enough for basic users, the premium version provides remote lock and wipe capabilities, enhanced backup and privacy advisor, all these for $3 per month (or $30 per year). We have no qualms to say that Lookout is amongst the best android security apps!
2. Norton Mobile Security Beta
Symantec’s Norton is one of the early entrants to the android security app space and they do have a quality product to show off. Now that we interact and use smartphones a lot, we leave a lot of private and confidential data within. Norton Mobile security (beta) allows you to remotely lock and/or wipe your phone data via a text message. What more? You can even lock down the SIM card so that the thief can’t swap it out to another phone. As you expect from any Norton product, even this app lets you scan your phone for malware and also lets you block calls and text messages in case you need.
3. AVG Antivirus Free
AntivirusFree from AVG (Droid Security) is a basic, yet popular Android security app which provides antivirus scan, malware scan, internet security, theft protection, remote lock/wipeout and SMS spam protection – everything for free. It does have a paid version – AntivirusPro which has even more functionality like premium SMS security and ad-free UI. Pro version costs $9.99, but for many users, the free version should suffice.
4. WaveSecure Mobile Security
One of the earliest entrants to the android security marketplace, WaveSecure has made a name for itself amongst Android users. It was recently acquired by McAfee (which was acquired by Intel), doesn’t offer anti-virus protection at this point, though it does provide backup and restore functionality, as well as the ability to locate, lock or wipe a device remotely. At $19.90/year it’s considered to be pricey by many especially since Norton’s Android security app does most of the things for free!
5. SMobile Security Shield
SMobile’s Security Shield app costs a whopping $29.99/year, but offers anti-virus scanning, anti-theft protection, remote device lock, and remote device wipe. What’s more? it even provides anti-spam protection, firewall and parental control features.
6. NetQin Android anti-virus
NetQin’s Mobile anti-virus app for android is a cloud based security app and protects your android device against virus and malware attacks. It also comes with anti-lost feature based on GPS tracking and also a full cross-server contacts backup system also provide full protection for users’ data. Did I say, it’s Free as well?
7. F-Secure Anti-Theft for Mobile
One of my personal favorites, when it comes to security, F-secure has released a dedicated app for mobile anti-theft which includes support for Android as well. As the name suggest, Anti-Theft feature ensures that that your personal information won’t be misused by anyone. f you suspect your phone is missing, remotely lock it or wipe the data so that your private text messages or pictures don’t end up in the wrong hands. You can also locate your phone remotely. You can download it for free!
8. F-Secure Mobile Security
F-secure’s mobile security app is a complete protection for your android device which includes antivirus scan, malware scan, browsing protection, remote locate and data protection. Unlike anti-theft app, this one will cost you $39.99 per year.
This space is growing at a rapid space. There are lot of other worthy mentions like
10. Roblock
12. AppScan
13. Mobile Defense
14. Theft Aware 2.0
Password Protection Apps
Android by default, provides password protect and auto-lock features. But with the below apps, you can take the android password protection to a new level.
This $2 app can add password protection to any android application – be it photos, SMS, Gmail, Calendar, Market etc.
This is a free app which lets you set PIN code to Messages, GMail, Market and others. It’s still in beta though.
17. Seal
Another premium password protection app which lets you secure your apps with a password or pattern and also lets you group the protected apps together. It is free to try but costs €2 to buy.
Password Management apps
18. LastPass
The most popular password management tool for Windows, Mac, Linux, iPhone, BlackBerry, Symbian and Windows Mobile is now available for Android as well. With a master password, safeguard the rest of your passwords on the cloud and sync it on multiple devices at ease. It’s not free though – costs you $12/year.
19. KeePassDroid
Another popular password management app on PC/Mac, KeePass has been ported onto Android – aptly named as KeePassDroid and is free just like the parent application.
Keeper is the most secure password management software which can protect your critical information with military-grade 128-bit AES encryption and enjoy a seamless experience across your desktop and mobile devices. It costs $29.99 per year subscription for 3 devices.
21. SplashID
SplashID is also a multi-platform application but comes in different versions – android only, desktop only and Android+Desktop version. The Android only version costs $9.99
File Security Apps
22. B-Folders
One of the best secure file storage apps for Android, B-Folders, allows you to store any kind of files and information, from trade secrets to credit card numbers and passwords and usernames in a secure, literally unbreakable environment which uses the AES 256 bit encryption and yeah, it’s free as well.
23. eWallet Viewer
eWallet Viewer is good for users who are already using the eWallet for desktop. This free viewer app lets you view any files and info stored on your desktop eWallet and synced with your android device.
More apps will be added as and when they become available. If your favorite app is missing, do let us know!
(Source)
Friday, February 4, 2011
How to INSTALL .APK files on ANDROID Windows SDK EMULATOR
In this tutorial we are going to learn how to install any given Android application in Android emulator using [dot]APK ".apk" files.
Steps For Windows7 (API v 2.2, v2.3)
Follow the instructions with SCREENSHOTS of the Android emulator. All you need is just the Android SDK platform with JDK or JRE (software development kit, with emulator) and .apk files. There is no need to install Eclipse or Netbeans SDK, to work with APK files [wiki]. An .apk file extension denotes an Android Package (APK) file. This file format, a variant of the JAR format, is used for the distribution and installation of bundled components onto the Android mobile device platform.
Step 1. Download and Install Android SDK: It can be downloaded from the official google website- here is a link to Latest Android SDK (for which you also need JAVA VM, JDK or JRE already installed). Read how to install it, before you proceed with this tutorial. Don't forget to update the SDK and also install the suitable platform version, in this tutorial we are going to use a stable Android Platform 1.5.
Step 2. Get a sample APK file: Let's take Sudoku.apk, kindly download it.
WINDOWS XP/VISTA/SEVEN System Setting
NOTE : For this tutorial, the SDK has been unzipped to this Windows folder location: "E:\android-sdk-windows\"Step 3. Create and launch the emulator (Virtual Android device):

Either you can start the emulator directly by running emulator.exe from "E:\android-sdk-windows\tools\"
OR Run the setup sdk "SDK Setup.exe" from "E:\android-sdk-windows\" and then create and start AVD (emulator), in the above picture you can see that we have already created bOtskOOl AVD using Android SDK and AVD manager. After a few minutes a virtual Android shall boot up and then observe the desktop view, as shown in the picture. Press on menu button and you will find that the applications are arranged in a grid view.


Step 4. Copy .APK files:
Now, manually copy and paste the Sudoku.apk to the destination folder "E:\android-sdk-windows\tools\".Step 5. Run adb command:
Go to Start>>run>>cmd (open a windows command prompt or shell) and type the following commands "highlighted in bold orange".cd e:\android-sdk-windows\tools\
comments: we do this in order to change our directory level to where the emulator is installed

comments: android emulator command to install the Sudoku application in .apk format.
Thats all, it's done. You must get a success message, Hurray!! You have installed your application successfully.
for Windows7 and android SDK v2.2, v2.3
"How to install .apk files in android SDK (v2.2, v2.3) on Windows7 "Here is an alternative solution for those who are getting this message: " 'adb' is not recognized as an internal or external command, operable program or batch file. " in android emulator on Windows7 with latest Android v 2.2, 2.3.
What I have noticed is that if you install the latest android SDK emulator, these three files adb.exe, AdbWinApi.dll and InstallAgent(batch file) are missing from "android-sdk-windows/tools" folder, which is required to run adb command. So I copied these three files to the "tools" folder and followed the steps described above.
Download the adb.zip file which contains adb.exe, AdbWinApi.dll and InstallAgent(batch file)
I have summarized the steps for Windows7 with latest android SDk:
STEP 1. Download the Latest Android SDK from Google
STEP 2. Install JDK(java development kit) from Oracle and then launch the "SDK Manager.exe", download and update the Android SDK version (eg. v2.3, API9) and other stuffs.
STEP 3. Create an AVD (virtual device) with a suitable android platform(API and version) using Adroid SDk and AVD manager.


STEP 5. Unzip adb.zip , then copy and paste adb.exe, AdbWinApi.dll and InstallAgent(batch file) to the "android-sdk-windows/tools/" folder.
STEP 6. Copy and paste Sudoku.apk inside the "android-sdk-windows/tools" folder.
STEP 7. Open a command line window(cmd), change your directory to "android-sdk-windows/tools/" where adb and Sudoku.apk is located "cd" command(see the command line pic). Run the adb command "adb install Sudoku.apk" and Njoy :D

In case if you get error messages then please do read the tutorial again, see to it that you have copied the apk file in the right folder or there is no uppercase/lower case error while typing file name. Now switch to your Android emulator, and click on the menu button, you will observe that a Sudoku application appears in the grid view.

If you want to uninstall any application, then please do read this tutorial on how to uninstall Android .apk files from emulator.
"On other websites, people talk about Environment variables, but in this tutorial installation it has been achieved without doing so and it works superbly."
Wednesday, February 2, 2011
Best of free ANDROID GAMES
ARCADE + ACTION
Labyrinth Lite

Labyrinth is the classic game where you control a steel ball by tilting a wooden labyrinth. This is the lite version with 10 fully playable levels and you can easily create 10 more of your very own.
Falling Ball


Tilt your phone to run left or right, to avoid falling balls. its quite amazing to dodge the balls by just a tilt of your phone. Do you think you are quick? Click the "right arrow" to start. Easier to play, can change the background.
Vampires Live™


Start as a lowly vampire and become the most powerful vampire lord! FEATURES: - Massively Multiplayer ONLINE Vampire Game! - Join over 2.5 million players!
World War™


APK file
It's the year 2012. A nuclear war has broken out. 5 countries have emerged as the major superpowers in the devastating war. Which one will you be? - Massively Multiplayer ONLINE War Game! - Join over 2.8 million players! - Battle other players LIVE!
PUZZLE + BRAIN
Chess for Android


Chess application with touch screen, trackball, or keyboard input. Highlights valid user moves and last played engine move. Undo up to eight half-moves. Engine plays at various levels. New in v2.2.2: loading and saving files to file.
aiMinesweeper (minesweeper)


APK file
Minesweeper is a mobile version of one the best single-player logical games ever made. The game is still very popular among players of different age and social origin.
Hangman Classic Free


Hangman is a classic word puzzle game. This hangman game comes with three classic themes that bring back old memory. Themes: Pencil on paper Chalk on blackboard Parchment Word Lists: English words, Animal, food & drink, fruit & veg, sports, family, colors, music, flowers, weapon, weather, SAT, GRE vocabulary and more
OpenSudoku


OpenSudoku is an open source sudoku game. Features: - Several input modes (finger-friendly, numpad in the bottom of screen etc.) - Puzzles can be downloaded from web or entered by hand - Game time and history - Export to sdcard - Themes.Go to http://opensudoku.eu
Resource
(Source)


